Deploying a Provider Hosted SharePoint App to Azure and SharePoint Online
In this post, we are going to walk you through the process of deploying a provider hosted SharePoint app to Microsoft Azure and Microsoft SharePoint Online. We assume that the app has been created, and the app permissions are configured correctly for what the app is supposed to do. I should note that this article will only be about apps that are being deployed to a local app catalog. Also, I’m assuming that you have a working knowledge of Microsoft Azure and Microsoft SharePoint Online and can provision your own sites and web apps within them.
To publish the web app to Azure, we’ll first need the publishing settings from your instance of an Azure Web App. To get them, log into your Azure dashboard, and click on and go to your web app’s dashboard (if you haven’t created one, do so now).
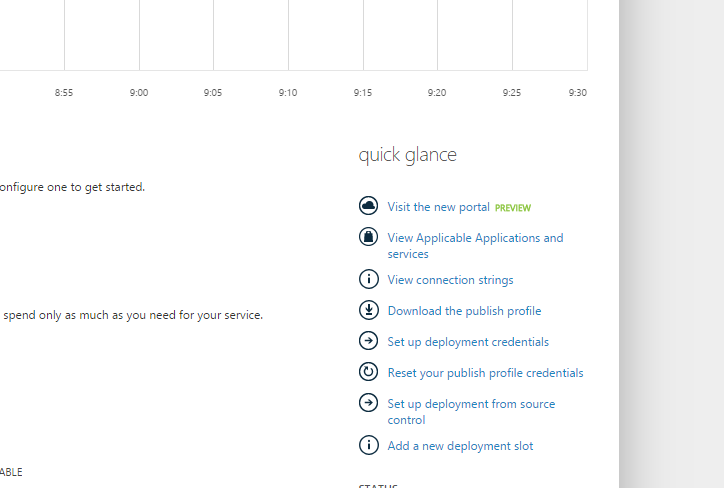
On the right side under “quick glance,” there will be a link to download the publish profile. This will be a .PublishSettings file that Microsoft Visual Studio will need during a later step.

Next, open your solution in Visual Studio, and open the web.config file of the web app.

In here we need to add a GUID to the value of ClientID. Generate one via your preferred method, and ensure it is all lower case. Also, open the AppManifest.xml file in the SharePoint app and replace the “*” with the generated GUID.

The last thing that needs to be done is to add the ClientID and Client Secret to the Azure Web App Config. Open up Azure, and go to the Configure section of the Web App. Once there, scroll down to the App Settings section and add two new entries, one for the ClientID and one for the ClientSecret, using the same values in your web.config file.

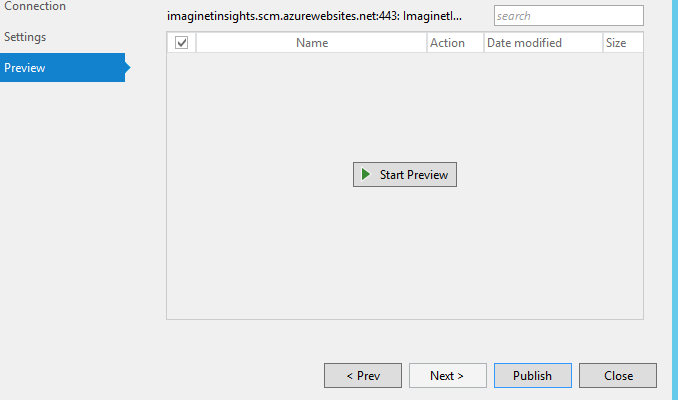
Now that all the setup has been completed, we can finally begin to deploy our app to Azure. Right click on the web app project node, and select publish. This publishing wizard will now display with a Profile section visible. Click on Import, and browse to the location of the .PublishSettings file we downloaded earlier. Once you hit OK, you will be taken to the Connection tab. Everything here will be imported from your settings file, so make no changes, and click on the Validate Connection button to ensure you can connect. Once verified, click next. On the Settings tab, there should be no reason to change any values (unless you wanted to deploy the site in debug to help solve errors). Click next. On the Preview tab, you can preview the changes that will be made to your site; in this case we are deploying a brand new site, so no need to preview. Just click on Publish.

Once complete, Visual Studio will open the site URL in your default browser. You’ll see just a generic welcome message, as your default page is actually a little deeper, usually in a pages folder. If you try to go to the default page, however, you will see an error page. This is because the page is expecting you to arrive via SharePoint and is looking for values that it is expecting to be sent. So, how do we get to see our site? We need to install the SharePoint App into our App Catalog.
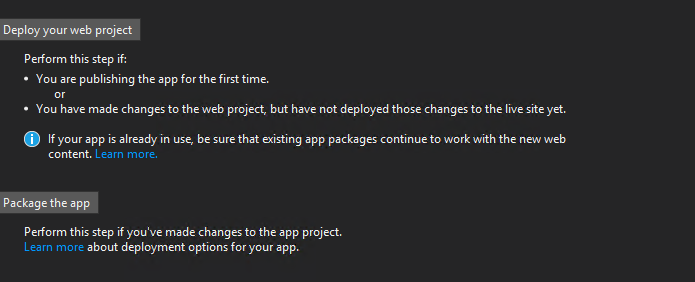
Close the browser, and head back into Visual Studio. From here, right click on the SharePoint App project, and select Publish. Here you will see where you can not only package your app, but also deploy your web project. We need to add the ClientID and ClientSecret to the deploy profile here again, so click on the edit button beside the Profile drop down. In this window, enter the values required, and click the Finish button. Click on the “Deploy your web project” button to ensure the latest bits are up there and then click on the “Package the App” button.
You’ll notice immediately that there is an error in the window. Any app that connects to SharePoint requires SSL. As such, you must change the URL here to https. Don’t worry, that is all you have to do, as Azure handles the creation of SSL secured URLs when you create the web app. Ensure your ClientID is correct (it should be auto-populated with the correct value), and click on Finish. This will open a Windows Explorer window. All you need from here is the .app file – copy and paste that somewhere more convenient as we will need it soon.

Navigate to your App Catalog site within the site collection to which you are deploying the app, click on Site Contents, and then click the “Apps for SharePoint” library. Click on New, and upload the .app file from the previous step. Click on Site Contents again, and this time click on “Add an App”. Select the “From your Organization” filter on the left, and click on the app you just uploaded. You’ll notice that you get an error stating that, “The specified application identifier is invalid or does not exist.” This is because there is one more step, which is to register the app for use on the site.
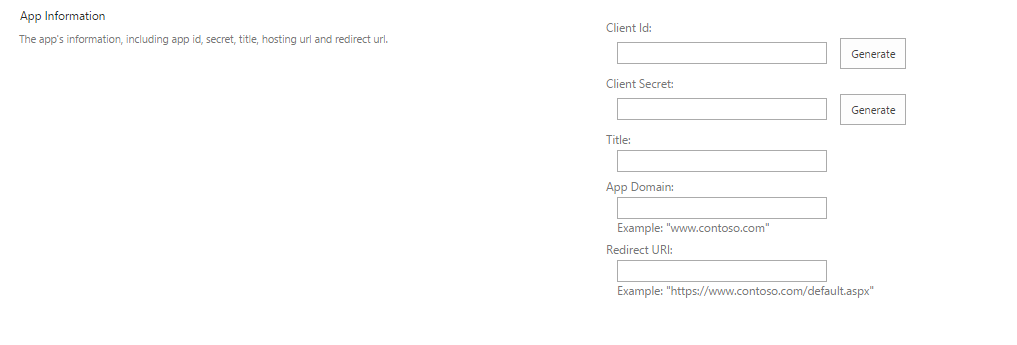
Navigate to “/_layouts/15/appregnew.aspx”. In this hidden away little page, we can register our app so that we are allowed to install it on the site. Enter your ClientID and ClientSecret values from your web.config file here, do not generate (You could have also used this page when creating these values in an earlier step), fill out a title for the app, as well as the domain it is on, and the location of the default page. Click on create, and you will be given a message that an Identifier has been created. Now go back to Site Contents, and click “Add an App”. Click on your app, and you will be shown the permission confirmation screen. Trust the app, and it will be installed to your site. Click on the App icon, and if all was configured correctly, you will be re-directed to your web app that lives in Azure.

I hope you enjoyed this article on how to deploy a provider-hosted SharePoint app to Azure or SharePoint Online. And remember, if you need any help with SharePoint, the Imaginet SharePoint consulting team is right around the corner to help you. From our SharePoint Assessment & Planning Workshops to our Custom SharePoint Development services to our SharePoint Managed Services program, Imaginet offers a wide variety of SharePoint consulting services to help you maximize your SharePoint investment. Contact us at info@imaginet.com or 1-800-989-6022.
Thank you for reading this post! If you enjoyed it, I encourage you to check out some of our other content on this blog. We have a range of articles on various topics that I think you’ll find interesting. Don’t forget to subscribe to our newsletter to stay updated with all of the latest information on Imaginet’s recent successful projects
related articles:
- Exploring the SharePoint Online Publishing Approval Flow
- Create Your First SharePoint Framework (SPFx) Web Part in 15 Minutes(Opens in a new browser tab)

discover more
Integration Between Power Platform and SharePoint Encourages Innovation
Organizations are focusing on innovation, streamlining their processes, and delivering better experiences for employees and customers. Power Platform and SharePoint are the Microsoft products that are helping organizations focus on…
Mastering Subagents in VS Code + Copilot: How To Actually Use Them
If you’ve ever dumped a giant problem into Copilot Chat and watched the conversation slowly turn into spaghetti, subagents are the feature you’ve been waiting for. Think of subagents as…
5 Common Misconceptions About Cloud Migration: Debunking the Myths
We’ve all heard of the cloud and cloud migration. But how important is it actually for your business? Organizations are moving to the cloud for several reasons: to improve agility,…
Let’s build something amazing together
From concept to handoff, we’d love to learn more about what you are working on.
Send us a message below or call us at 1-800-989-6022.


