

Implementing External Email Tagging in Outlook
External email warning tag helps to alert users from clicking malicious links and phishing emails sent by external senders. It plays a vital role in protecting against spam and phishing threats. For these years, admins use a transport rule to prepend in the subject line.
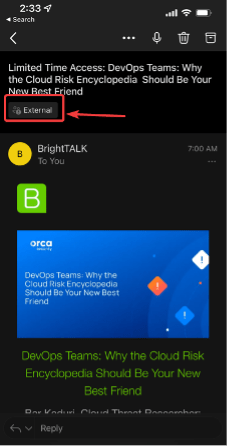
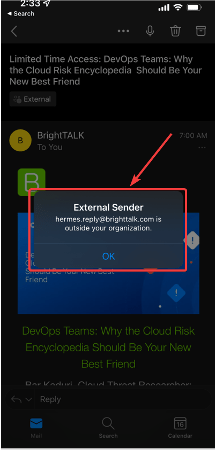
In this blog, let’s discuss implementing an ‘external’ tag identifier on your business email. This feature implements an “External” tag identifier on Outlook for email messages received from outside your organization. Microsoft created this feature in hopes that the external tag will help users easily identify spam and phishing threats from external senders. When someone outside your organization receives an email, an “External” title will be present in Outlook on the web, Outlook for Mac, Outlook for iOS, and Android. After clicking the external tag, the email address for the sender will be shown.
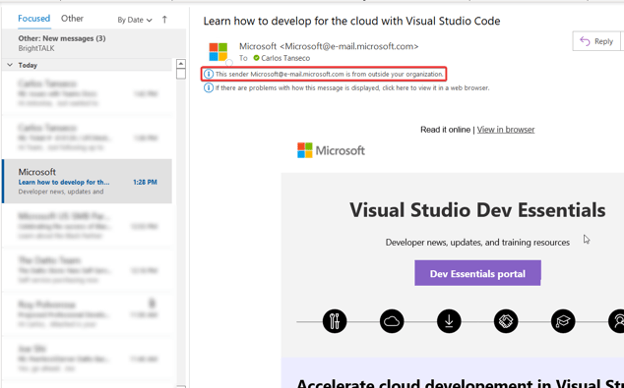
In Outlook clients for Windows, a mail tip will be present at the top of the reading pane.
If you click the mail tip, it will give you the option to Add a Sender to the Blocked Senders List.
How to turn on the external email tagging feature
Since external tagging is disabled by default, you will need to manually turn this feature on.
- Load the exchange online module on PowerShell.
Import-Module ExchangeOnlineManagement - Connect to Exchange Online PowerShell using an admin account. For example:
Connect-ExchangeOnline -UserPrincipalName name@imaginet.com
This will prompt a log-on screen for you to enter your password. - Turn on external tagging.
The following command will enable external tagging for the whole organization.
Set-ExternalInOutlook -Enabled $true- You could also omit senders and domains from the external tagging feature. For example, to omit admin@fourthcoffee.com
- I would enter the following:
- Set-ExternalInOutlook -AllowList admin@fourthcoffee.com
- To omit a whole domain, use the following example:
- Set-ExternalInOutlook -AllowList “quest.com”, “google.com” – Enabled $True
- Adding one domain at a time may throw an exception. A quick workaround would be to add two domains at a time.
- You could also use the get command below to verify that you have enabled the External tagging feature.
- Get-ExternalInOutlook
To omit a whole domain, use the following example:
Set-ExternalInOutlook -AllowList “quest.com”, “google.com” – Enabled $True
Adding one domain at a time may throw an exception. A quick workaround would be to add two domains at a time.
You could also use the get command below to verify that you have enabled the External tagging feature.
Get-ExternalInOutlook
Please note that once this feature has been enabled, it may take 24-48 for you to start seeing the External sender tag in email messages received.
Hope this quick tutorial helps you implement the external email identifies tag in your organization and secure your organization from malicious external emails.
Thank you for reading this post! If you enjoyed it, I encourage you to check out some of our other content on this blog. We have a range of articles on various topics that I think you’ll find interesting. Don’t forget to subscribe to our newsletter to stay updated with all of our latest information on Microsoft Stack.

discover more

Converting Angular to Blazor: What is Blazor, and Should You Make the Switch?
Blazor is a somewhat new web framework used to create interactive web applications with ASP.NET and build web UIs using C# as the primary technology. The option to use JavaScript…

Are You Cyber Safe? Protect Your Microsoft 365 Products from Online Threats – Part 2
Last week, we published a blog that provided tips for protecting your Microsoft 365 products against malicious cyber threats. Cybersecurity is not something to take lightly, and with technology constantly…

Are You Cyber Safe? Protect Your Microsoft 365 Products from Online Threats – Part 1
Technical debt is a serious issue. Learn what it is, how to prevent it, and how to fix it.
Let’s Build Something Amazing Together
From concept to handoff, we’d love to learn more about what you are working on.
Send us a message below or call us at 1-800-989-6022.