

Using Azure DevOps to Deploy Web Apps to IIS
August 3, 2023
.
Azure DevOps makes it easy to deploy applications to almost any environment you want. You can configure Azure DevOps to release to an on-premises web server running IIS (Internet Information Services) in only three steps. In this blog, we’ll walk you through how to create a deployment group, configure the web server to be a deployment target, and set up the release pipeline to deploy the web application onto the target.
Create a Deployment Group
The first step in the process is to create a new deployment group in your Azure DevOps project. Under the Pipelines menu, select the Deployment groups menu item to open that page.
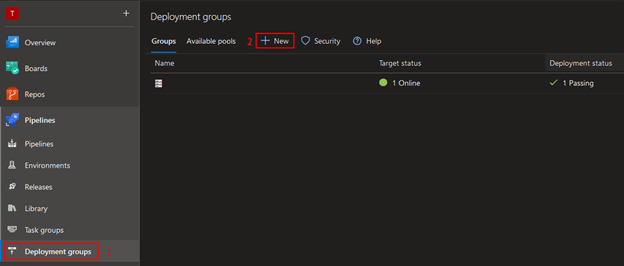
Click the New button (shown above) to begin creating a new deployment group.

Enter your deployment group name and a description of the group. Click Create to finish the process, which will add your new group and create a PowerShell script to run to define the target of your deployment group.
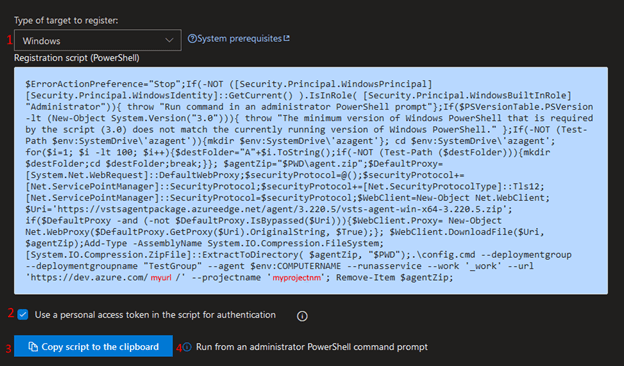
Take time to customize what you need to suit your configuration. We recommend using a personal access token to handle the authentication between the target machine and Azure DevOps. Copy this script to the clipboard or a file for use in the next stage.
Configure the Deployment Group Target
For this stage, you will need access to the physical web server directly or through Remote Desktop Protocol (RDP). On the web server, open an administrator PowerShell command prompt, as noted in the screenshot above. Paste the script into that PowerShell and execute it. Follow the prompts to complete the process; it will take a few minutes. If you accept the defaults, you will create the Azure deployment agent under the C:\ and set up a Windows service on the machine to run the deployments when a release is triggered. You can use tags to uniquely identify the target if you have more than one target environment. If you are running an older server for IIS, you need to set it up to use Transport Layer Security (TLS) 1.2, as this is an absolute requirement for connecting to Azure DevOps.
Configure the Release Pipeline
Now that you have a deployment group and have run the script on the server, you should be able to see that the target server is online in the deployment group. All you need to do now is set up the release pipeline.
First, define a new deployment process with the Configuration type “IIS Website.” Configure the settings according to your requirements.
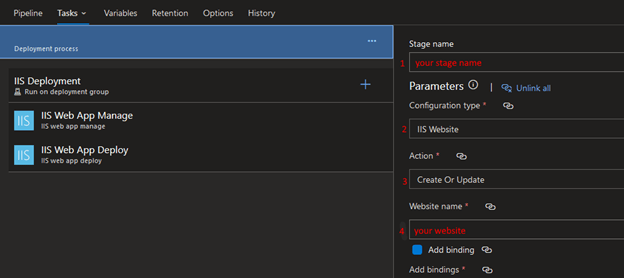
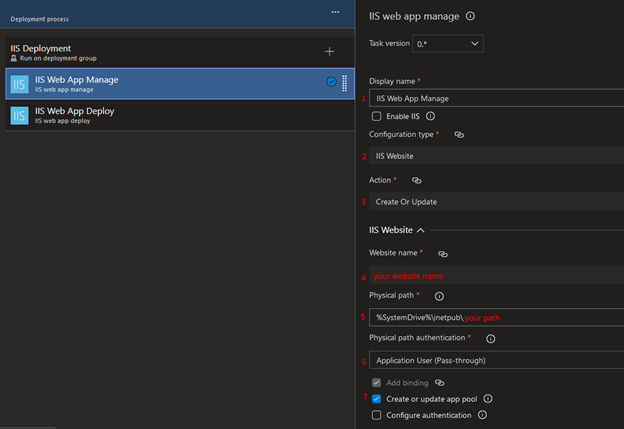
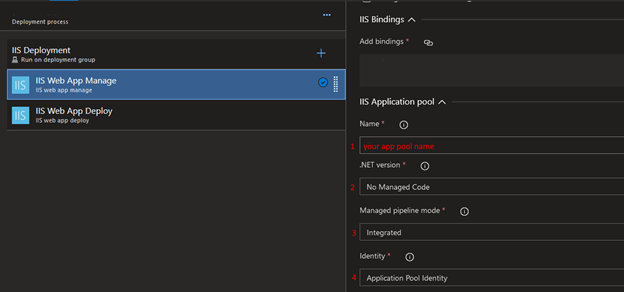
Then, add an IIS Web App Manage task and configure the settings appropriately to create the website and application pool (as shown in the next two screenshots).
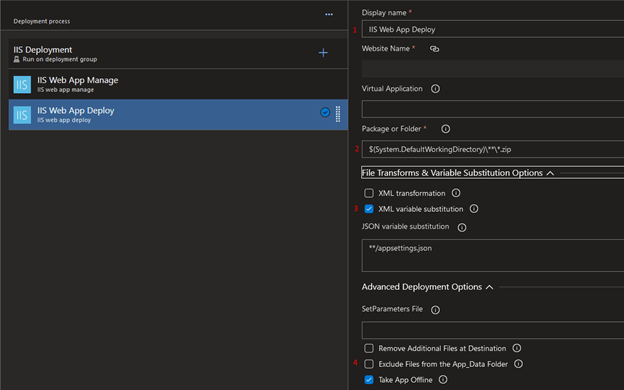
Then, add an IIS Web App Deploy task and configure the settings to install the release version of your application to the newly created IIS Website from the previous task.
Finally, save your release pipeline and create a new release. If you have followed these steps correctly for your environment you should see your release connect to your target web server, create or update the IIS website and application pool, and deploy your application into IIS. At this point, it should be ready for you to test!
We hope you’ve found this tutorial helpful, and if you have any trouble or questions you need answered, we’d love to assist you. Complete the contact form below this post and one of our team members will be in touch as soon as they can. And don’t forget to subscribe to our blog for more helpful content.

Discover More

Converting Angular to Blazor: What is Blazor, and Should You Make the Switch?
Blazor is a somewhat new web framework used to create interactive web applications with ASP.NET and build web UIs using C# as the primary technology. The option to use JavaScript…

Are You Cyber Safe? Protect Your Microsoft 365 Products from Online Threats – Part 2
Last week, we published a blog that provided tips for protecting your Microsoft 365 products against malicious cyber threats. Cybersecurity is not something to take lightly, and with technology constantly…

Are You Cyber Safe? Protect Your Microsoft 365 Products from Online Threats – Part 1
Technical debt is a serious issue. Learn what it is, how to prevent it, and how to fix it.

Let’s build something amazing together
From concept to handoff, we’d love to learn more about what you are working on.
Send us a message below or call us at 1-800-989-6022.